VPN or Virtual Private Network offers security and privacy to private and public networks, thereby enabling the user to connect to multiple systems to the VPN server and use VPN’s bandwidth for public network connection.
Installing a VPN is one of the most inexpensive ways to build a secured private network. However, a fair amount of technical knowledge is required for its successful implementation. Various VPN protocols are used for secured communication such as SSL and TLS, IPSec, PPTP, and L2TP.
Out of these VPN protocols, PPTP (Point-to-Pont Tunneling Protocol) is a widely used protocol as it provides flexibility in setting up and maintaining as compared to other protocols.
While there are several paid VPN software available in the market, RRAS can be used to configure your VPN server without any additional cost if you are running it on a windows server.
Remote and Routing Access or RRAS is designed to offer excellent performance in both a router and a remote access server because it supports a wide array of features.
Only a small subset of features like support for IKEv2 VPN connections and LAN routing is required for this deployment.
IKEv2 is a VPN excavating protocol chronicled in Internet Engineering Task Force Request for Comments 7296.
The primary advantage of installing an IKEv2 is that if there is an interruption in the underlying network connection, the protocol would tolerate it.
For instance, in losing the connection temporarily or if the user wants to move a client computer from one network to another when the network connection is reestablished, IKEv2 would automatically restore the VPN connection.
The core perk being all of this would take place without any user intervention.
To support IKEv2 connections while disabling unused protocols, the RRAS server has to be configured.
This is because there is a decrease in the server’s security footprint. Additionally, the server has to be constructed from a static address pool to assign addresses to VPN clients.
Addresses can be feasibly assigned from either a DHCP server or a pool, but using a DHCP server not just delivers minimal benefits but also adds complexity to the design.
This installation of VPN using RRAS applies to users of Windows Server 2022, Windows Server 2019, Windows Server 2016, Windows Server 2012 R2, and Windows 10.
Before installing the VPN using an RRAS, the server infrastructure has to be configured, followed by the installation and configuration of the Network Policy Server (NPS).
Things to consider before installing VPN using Remote and Routing Access (RRAS)
It is important to: –
- If you are installing the VPN server on a Virtual Machine (VM), you need to install two Ethernet network adapters in the physical server.
- You also have to create two External virtual switches, one each for the physical network adapter. Additionally, two virtual network adapters for the VM are required to be created, having a virtual switch connected to each network adapter.
The server has to be installed on your perimeter network between the edge and internal firewalls.
One network adapter should be connected to the External Perimeter Network, whereas another network adapter has to be fixed to the Internal Perimeter Network.
Steps to install VPN using RRAS
- Login through the Remote Desktop by connecting to the server on which you want to install VPN
- On the VPN server, open the Server Manager, select ‘Manage’, and then click on ‘Add roles and features.
- The Add Roles and Features Wizard opens.
- Follow the steps for the installation wizard. On this ‘Select Installation Type’ page, select the ‘Role-based or feature-based installation‘ Installation Type option and then click on next.
- In the Select destination server page, check the ‘Select a server from the server pool’ option and see your server with the computer name in the server pool.
- Under Server Pool, select the local computer and then ‘Next’.
- Land on the ‘Select server roles page, click on ‘Remote Access’ and then on ‘Next’.
- Do not make any changes on the ‘Select features page’, and click on ‘Next’.
- On the Remote Access page, check ‘Next’.
- After reviewing the installation page, click on install once you are ready. On completion of installation, check ‘Open the Getting Started Wizard’.
- Select the ‘Notifications flag’ on the VPN server, in Server Manager.
- You will see the ‘Configure Remote Access‘ wizard on the screen. Click on ‘Deploy VPN only.
- The ‘Routing and Remote Access MMC’ opens. Right-click on your VPN server name and then select ‘Configure and Enable Routing and Remote Access.
- Follow the installation wizard instruction on the ‘Welcome to the Routing and Remote Access Server Setup Wizard’, and select ‘Next’.
- In the configuration wizard, select ‘Custom Configuration’ as ‘Virtual Private Network (VPN) access and then select ‘Next’.
- The ‘Completing the Routing and Remote Access Server Setup Wizard’ starts.
- An IP Address Assignment, select ‘From a specified range of addresses and click on ‘Next’.
Click on ‘Finish’ to close the wizard. You will be prompted with a message for the DHCP relay agent, simply click on ‘OK’ to close the Routing and Remote Access dialog box.
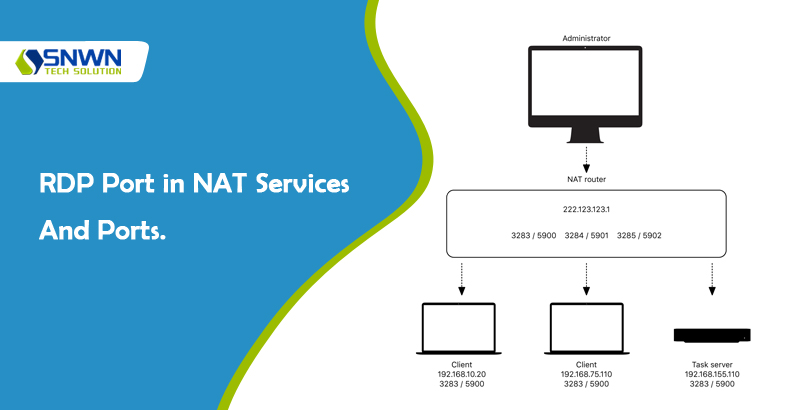
Follow the below-mentioned steps to allow your RDP port in NAT services and ports.
- In the ‘Routing and Remote Access’ dialog box click on ‘Expand the server’ → IPV4 → NAT.
- Right-click on ‘External Network’, then ‘properties’ → Services and ports.
- Select ‘Add’ and enter the description for this service.
- Enter the IP Address and RDP port of the VPS and select ‘OK’.
After completing these steps, your VPN server is ready for client/remote connections. On receiving access to the connection, you have to configure the client machine to connect to the VPN server.
- Open the ‘Network and Sharing Center’ of your local system.
- Select ‘Set up a new Connection or Network’.
- Check ‘Connect to a workplace’.
- Click on ‘Use my Internet connection (VPN)’.
- You will receive an option to enter the IP address of the VPN server, after that click on ‘Next’.
- Enter the login details of the VPN server.
- After that, click on ‘Connect’.
- That’s it, your local machine is connected to a VPN server.
- Upon checking your IP address from any online tool, you will witness that your IP address is not from a local ISP, but rather from a VPN server.
That’s all, your client machine will now have the access to the internet through a VPN.
Also Read: Top 5 Benefits of Google Workspace for Your Online Business